Table of contents:
- Geolocate your posts
- Customize your markers
- Display your first map
- Filter your items and change the map dimensions using the Shortcode Helper
- Add several markers on a single post
- Change Tiles Provider to customize your map
- Uninstall Travelers’ Map and clean up your database
- Developers documentation
Geolocate your posts
Once the plugin is installed and activated on your WordPress website, the first step is to geolocate your posts. To do this, Travelers’ Map automatically adds a section at the bottom of the editing area of each article.
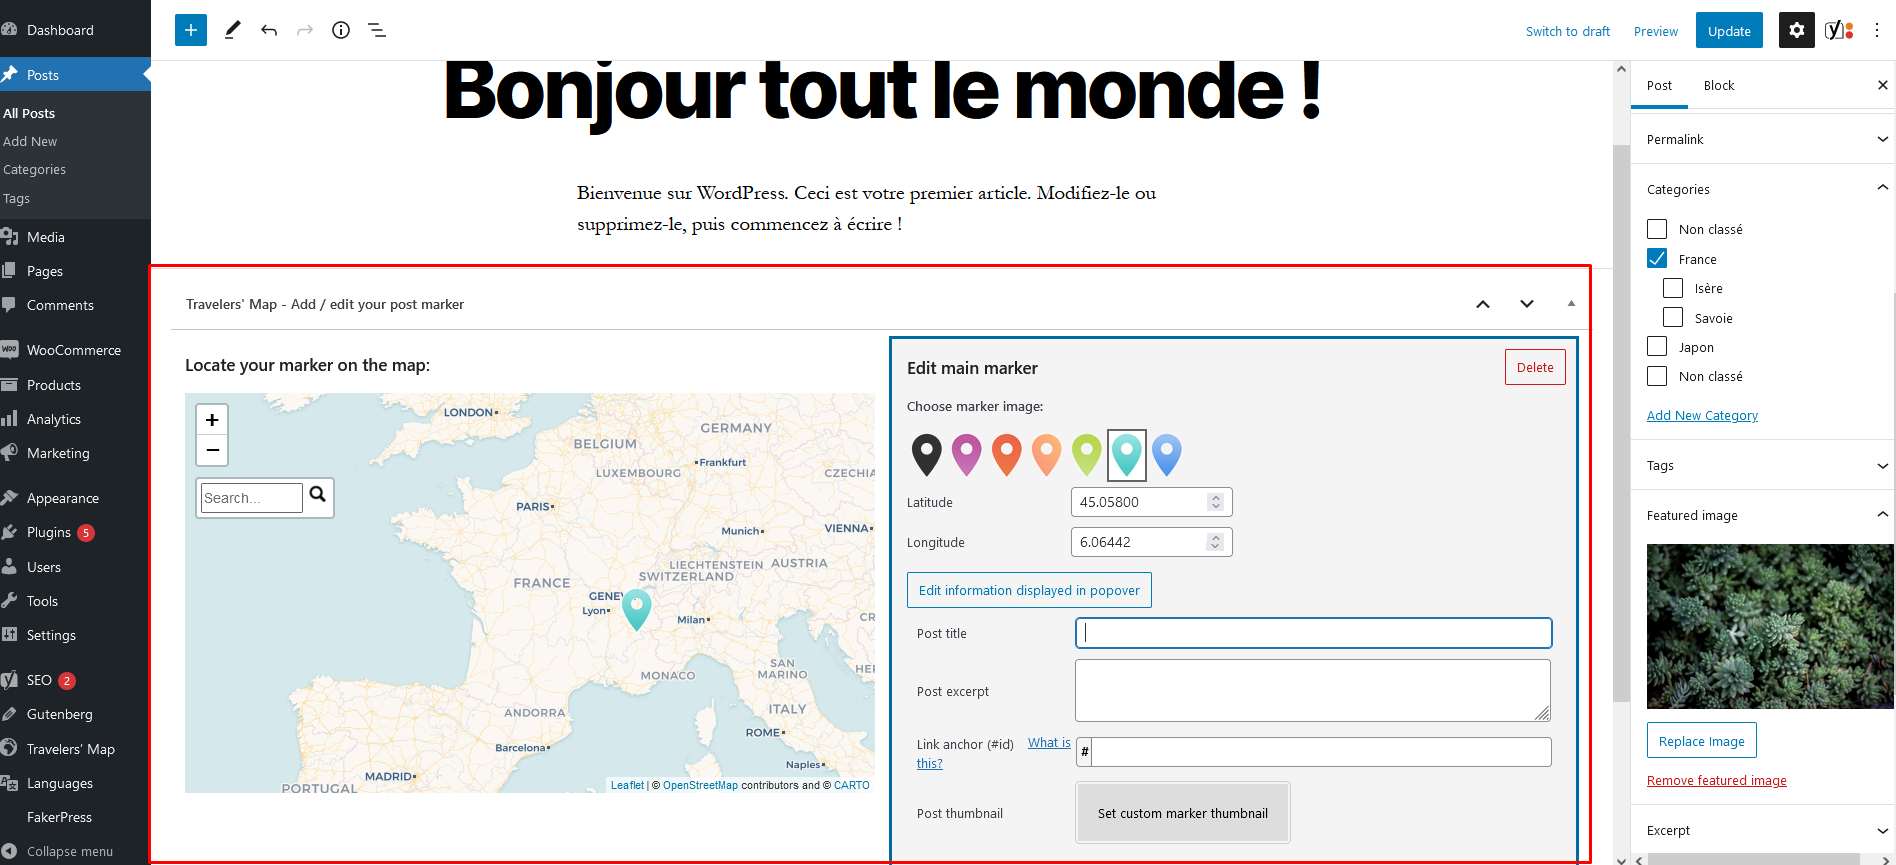
The map makes it quick and easy to change the location of your marker. You can search or simply browse the map. Click on the map to place your first marker. It will then be displayed. You can click again on the map to move it, or with a click and drag. The Latitude and Longitude fields update automatically.
Choose the marker of your choice in the second part (on the right of the map, or below depending on the size of your screen).
By default, the marker will display the title, the excerpt, and the featured image of your post. You can change this information by clicking on the « Change information displayed in popover » button. If you fill in any of these fields, this information will replace the post information in your popover.
Once finished, don’t forget to publish or update your post to save the changes.
Customize your markers
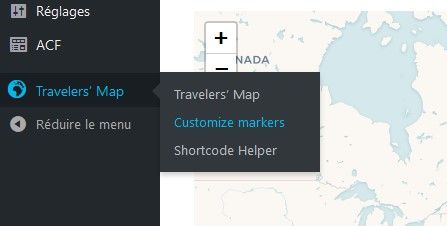
To add markers images, go to the left side panel of WordPress administration, under « Travelers’ Map » tab > « Customize markers« .
A similar page to adding a post opens. To create a new marker, click on « Add new » at the top of the page.
All you have to do now is add a title, add a « Featured image » representing your custom icon and Publish.
Note: .png format is prefered, as it allows you to have a transparent background around the marker unlike the .jpg format. The optimal size for a marker is 45 pixels on its longest side.
Display your first map
To display a map on a page or post, you will use a shortcode. A shortcode is a small code you insert into your content between [brackets]. It is then automatically executed when the page is viewed by visitors.
The shortcode of Travelers’ Map is [travelers-map]. When it is inserted into the content of your page, it turns into a dynamic map, with a width ofv 100% of your content area and 600 pixels high. All the articles you have previously geolocated are displayed there (see: Geolocate your posts).
If you want to change the size of the map and filter the items to display, read the section below.
Filter your items and change the map dimensions using the Shortcode Helper
The Travelers’ Map shortcode also accepts settings. To simplify your task, help is integrated into the plugin in « Travelers’ Map » > « Shortcode Helper » tab.
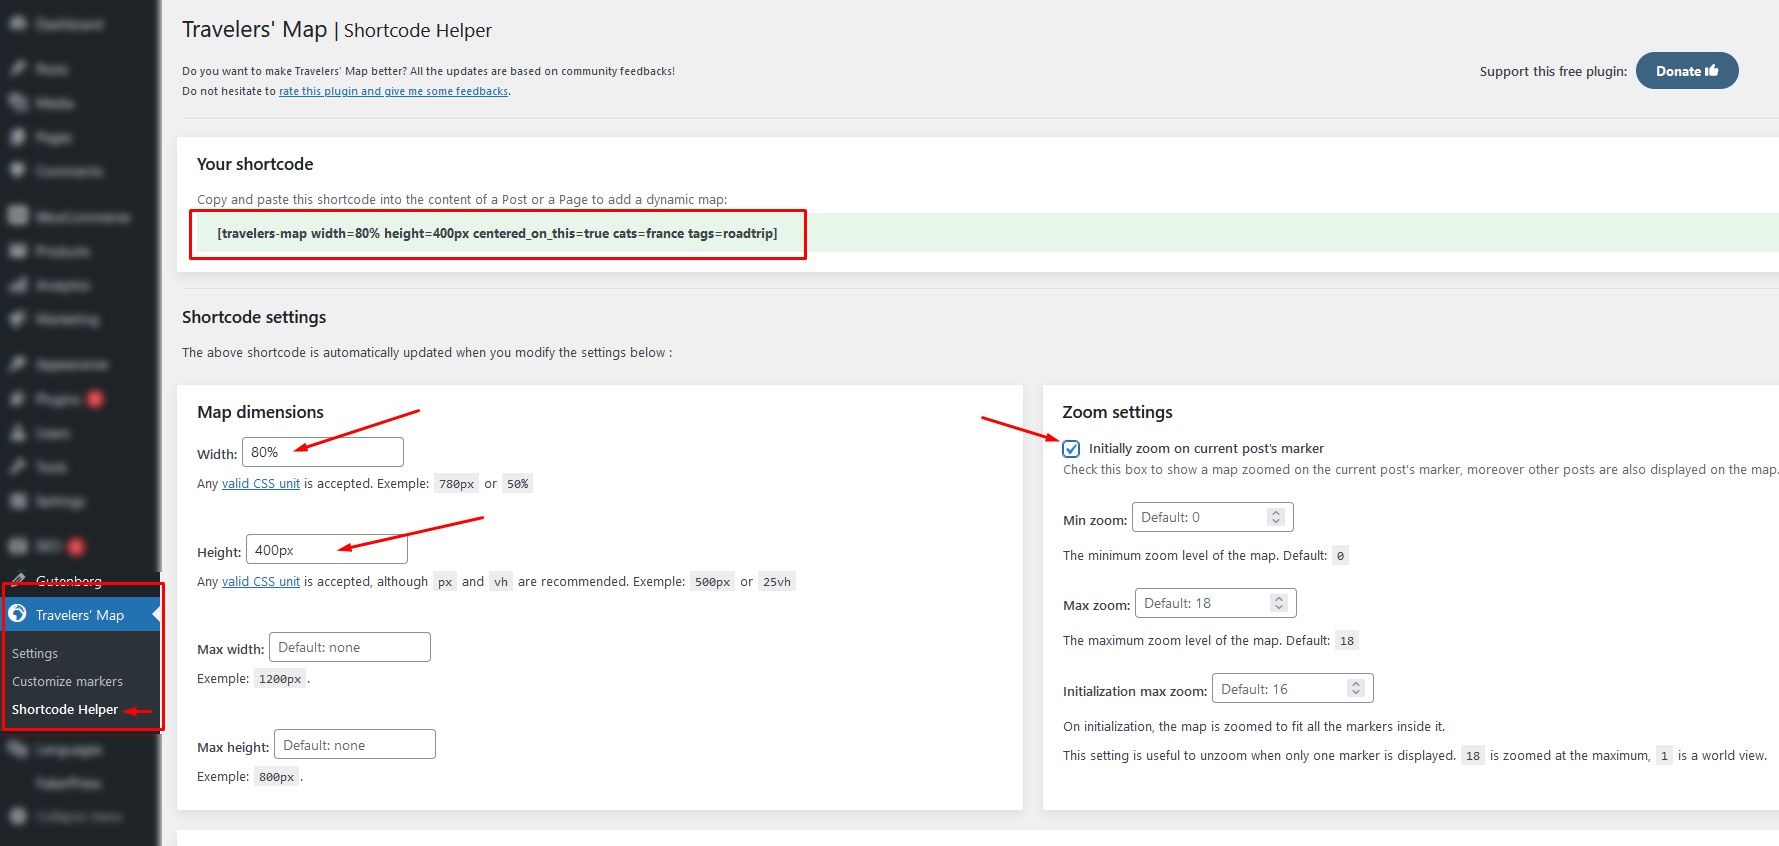
In this page, when you insert settings or filter categories / labels, the shortcode at the top of the page is automatically updated. Once finished, all you have to do is copy and paste this shortcode into one of your pages.
Each setting is explained on the helper page, so take the time to read all the possibilities offered by the extension if you want to customize it.
For example, here are some useful parameters:
- this_post=true: displays only the marker of the current post (if the shortcode is added on your posts)
- centered_on_this=true: displays all markers, but will zoom in on the current item when the page loads.
- current_query_markers=true: display the markers corresponding to the page’s query. For example, on your category pages, you can display the posts of the current category, without having to change the shortcode on all your categories (example on my blog).
You can also display a map on your search results page. Awesome, isn’t it? - You can filter by category (cats=isere,savoie), by tag (tags=randonnee), by post type (e.g. your Woocommerce products) and by custom taxonomies (e.g. your Woocommerce product categories)
Note: Filters can be added together, for example, you can sort items in the « France » category that have a « Bivouac » tag.
Add several markers on a single post (coming soon)
New in Travelers’ Map V2 (currently in beta, download on github) : You can add multiple markers to a single post! This is great for multiple days of hiking, or city tours for instance. Go to the edit page of your article, in the Travelers’ Map section.
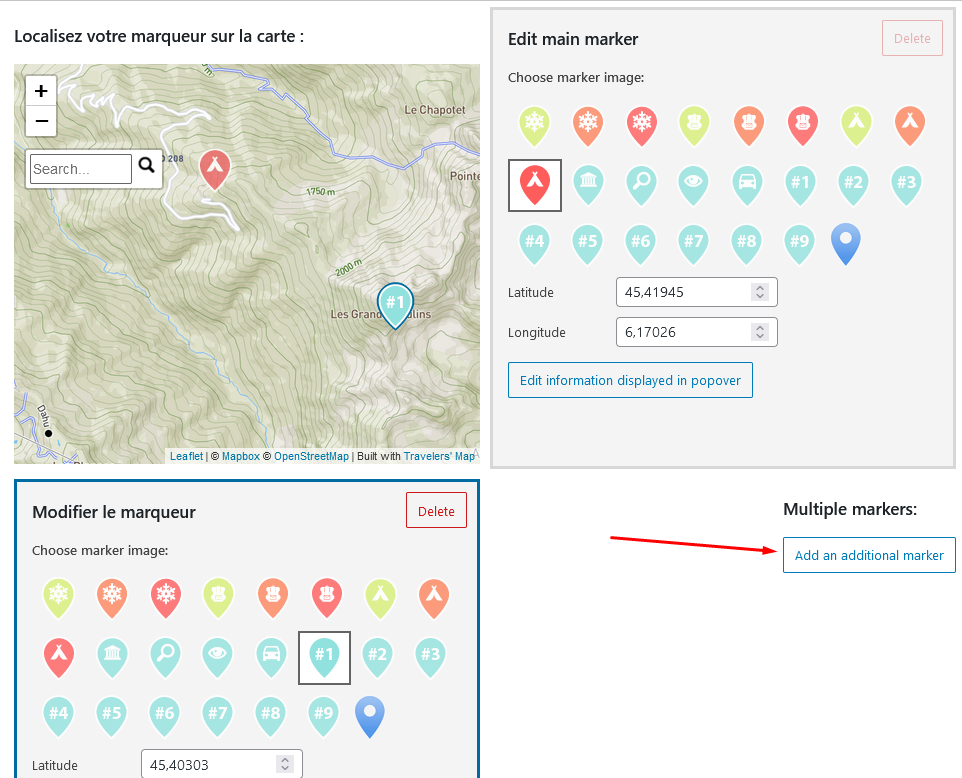
Editing the second marker is done in the same way as the first. When there are several markers on the map, the click moves the « active » marker, i.e. the marker surrounded by a blue border. This border surrounds the marker icon on the map as well as the marker edit block. The first marker is mandatory, it is the main marker.
Adding an anchor to additional markers
If your article contains several markers, it is helpful to be able to add an anchor to your link. This way, the user will be automatically directed to the desired location in your post when they click on the link in the tag.
Step 1: Add an anchor to the desired element on your page.
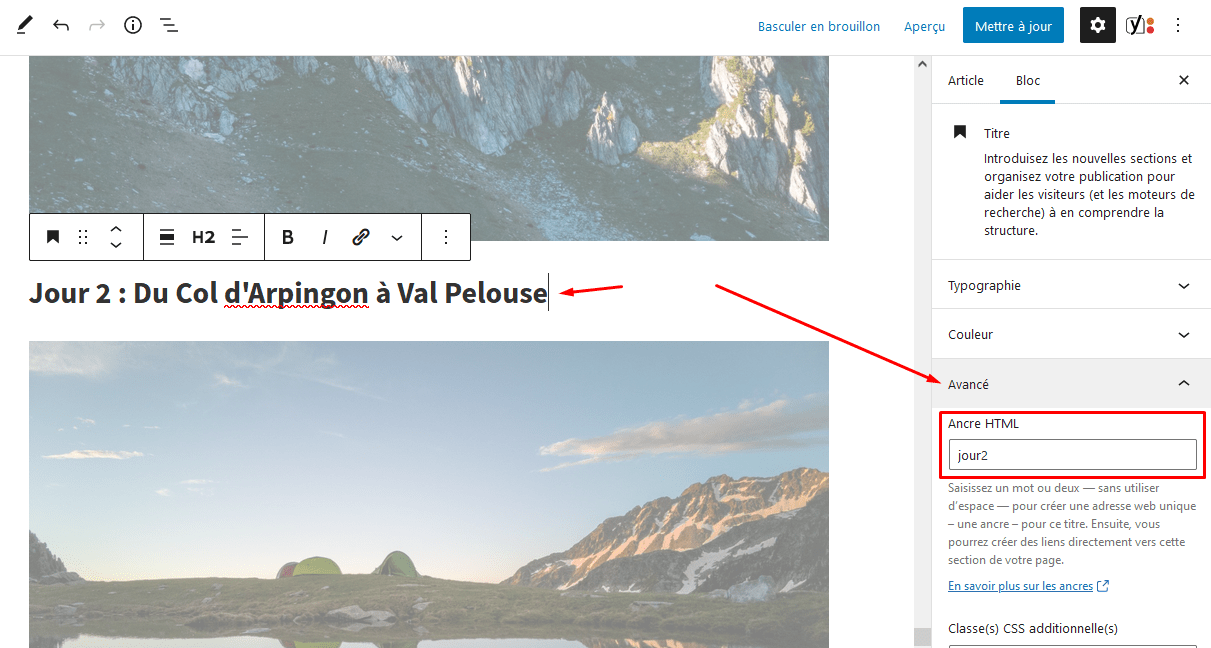
Click on the block you want to link to your marker. Go to the right in the block settings. In the « Advanced » tab, fill in the « HTML anchor » field.
Step 2: Go to the Travelers’ Map editor at the bottom of the page, click on « Edit information displayed in popover » and fill in the link anchor (#id) fields.
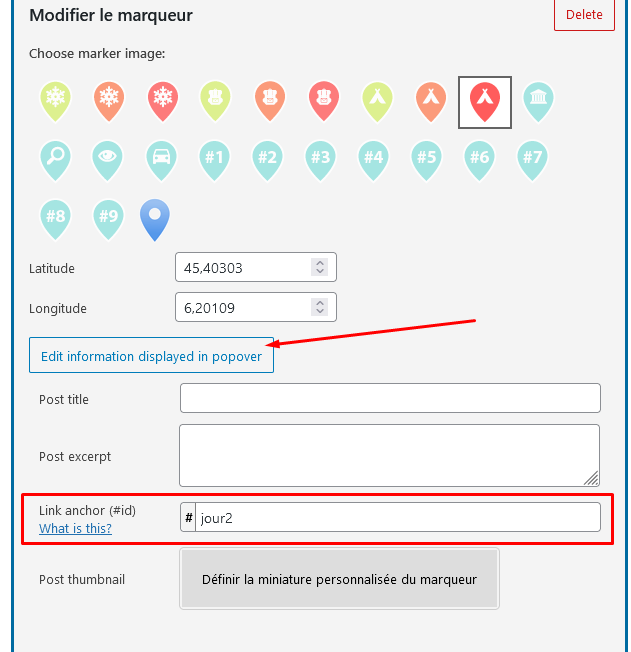
There you go, save your post and your marker will point directly to the right place when users click on it.
Change Tiles Provider to customize your map
Note: You may have noticed that the map on my site is different from the default Travelers’ Map map.
The difference is the Tile provider. Providers use OpenStreetMap’s open data to create maps, each with its own specificities. Some are specialized in hiking and display elevation contours, others are black and white…
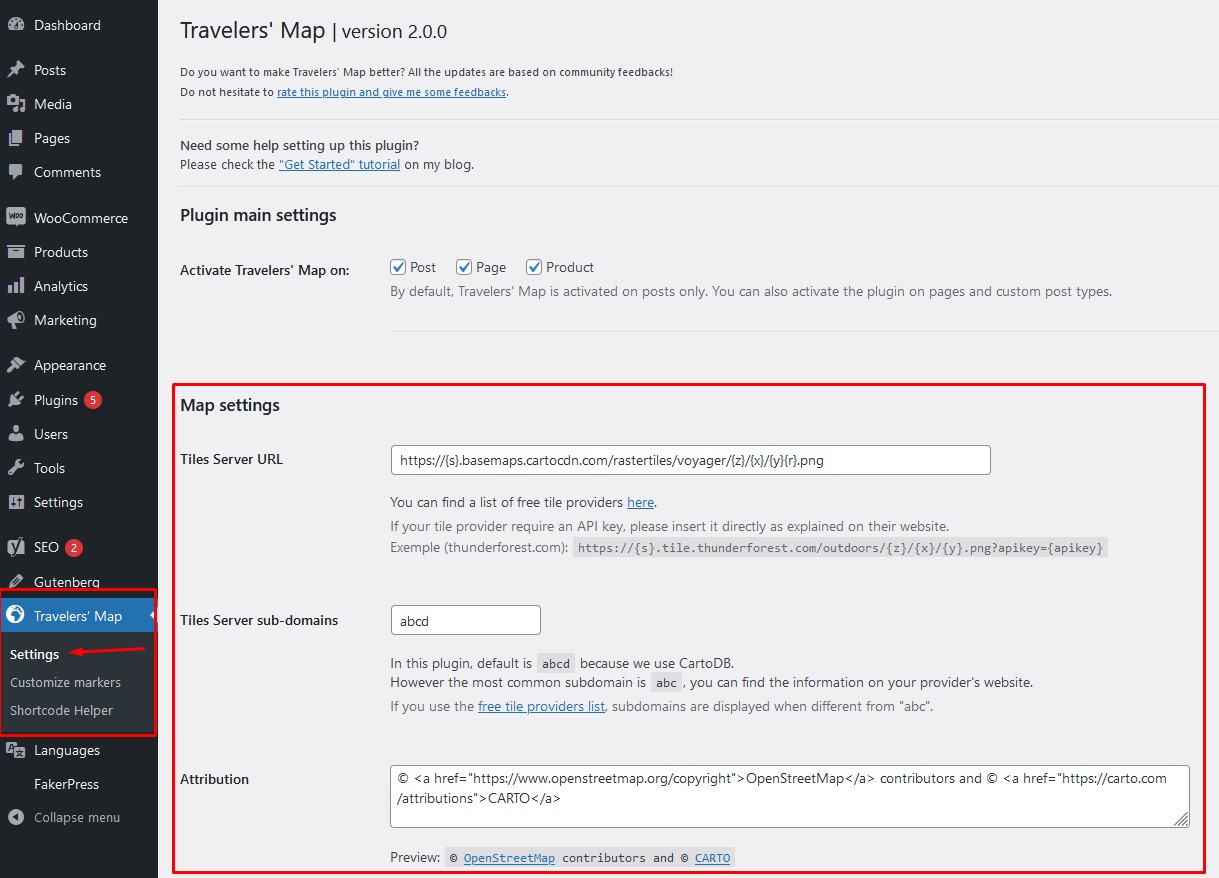
To personalize your map, go to the left side panel of WordPress administration, under the « Travelers’ Map » tab.
To find a free tile supplier, I recommend Leaflet Providers demo page.
On this website, when you click on the different suppliers on the right, the map changes, and all the information you need in Travelers’ Map are available:
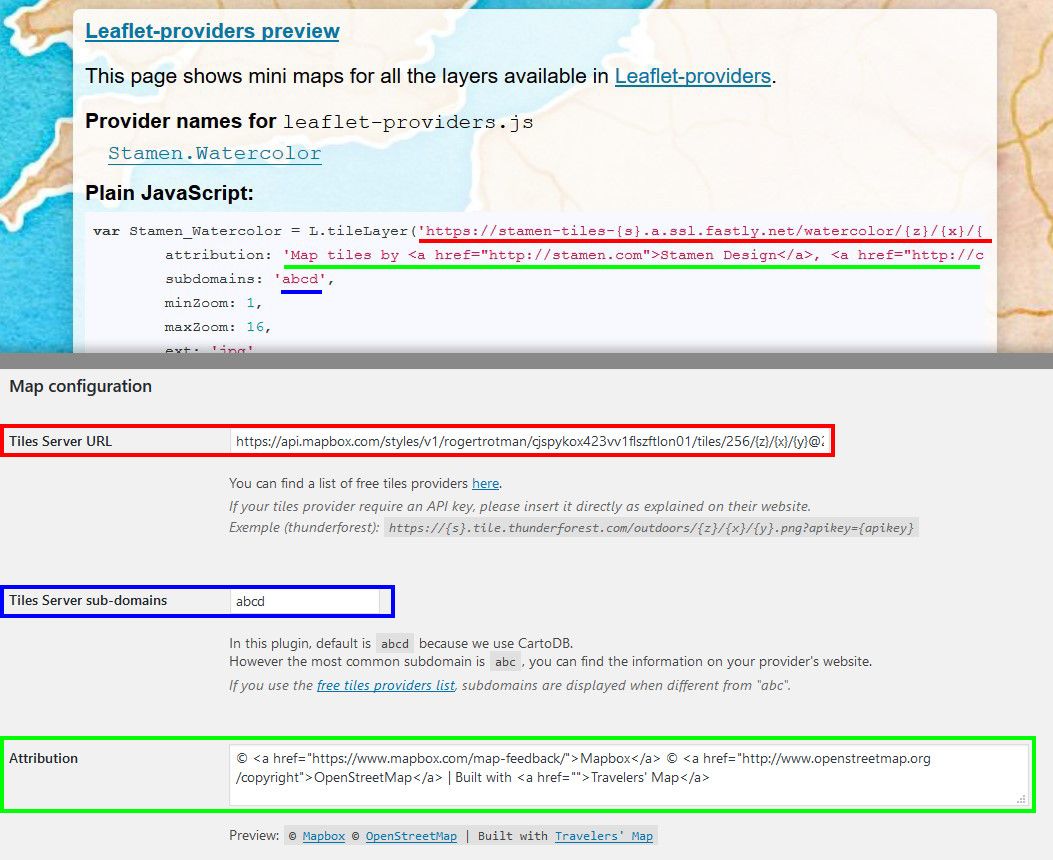
Tiles Server URL is represented by L.tileLayer (« Address ») on Leaflet Providers. If your tiles provider requires an API key, insert it directly into the address, as indicated on their website. For example, the url of Thunderforest looks like this: https://{s}.tile.thunderforest.com/outdoors/{z}/{x}/{y}.png?apikey={apikey}
Here, replace {apikey} with your API key, without the acolades.
Tiles Server sub-domains They are represented by « subdomains » on Leaflet Providers. If subdomains are not specified, enter abc in the field.
Attribution is the text displayed at the bottom right of your map module. It is mandatory when you use the free data from OpenStreetMap and the Leaflet module. In addition, each Tiles provider requires attribution. You will find the necessary Attribution on Leaflet Providers.
Once finished, save the information by clicking on Save Changes. You can reset the options to their original state by clicking Reset settings to default.
Uninstall Travelers’ Map and clean up your database
The geolocation data of your posts are saved as meta-data and are not deleted if Travelers’ Map is disabled or deleted. This is to prevent a user from losing all his data when he mistakenly deactivates/deletes his plugin for debugging purpose.
However, if you want to uninstall Travelers’ Map permanently, an option is available in the « Travelers’ Map » tab at the bottom of the page to delete all geolocation data from your posts.
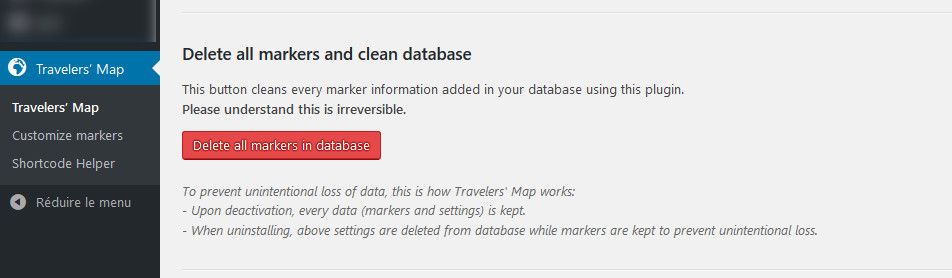
Once the data has been deleted, you can uninstall the extension in your « Plugin » tab.
Developers documentation
- Interact with the maps objects
- Interact with the markers objects
- Use filters to modify popovers (2.2.0)
If you want to interact with your maps on the front-end with javascript, it’s possible since version 1.7.0 of Travelers’ Map! Let’s dive into it with an example.
Interact with the maps objects
The array « cttm_map » containing all the maps objects of Travelers’ Map is now set as a global variable, so you can interact with it from anywhere.
I also created the custom event « cttm_map_loaded » to listen to, so that you know when the maps have been initialised.
Here is a commented code showing how to interact with the maps:
<script>
// Listen for the event.
document.addEventListener('cttm_map_loaded', function (e) {
  // cttm_map is an array of all the maps included in the page, so we loop through each.
  for (let i = 0; i < cttm_map.length; i++) {
    //You can now interact with the map object.
    cttm_map[i].setView([45.30824,5.85554], 10);
  }
}, false);
</script>
There we go, now the maps on my pages are centered on « La Dent de Crolles », a beautiful peak you should hike 😉
Example: Adding Leaflet.Locate plugin to my maps
Leaflet.Locate is a Leaflet plugin adding a button to geolocate the user. It’s available here.
First, we need to enqueue the plugin’s styles and scripts into our wordpress theme. Be sure to upload the .css and .js files into your ‘wp-content/themes/your-theme/css’ and ‘…/js’ folder, register them and enqueue them in your functions.php file.
If you are not familiar with this, you can easily find how to do it by searching on the internet. As a last resort, you can copy and paste the code below in the head tag of your header.php, but you should know this is not the best way to do it.
<link rel="stylesheet" href="https://maxcdn.bootstrapcdn.com/font-awesome/4.7.0/css/font-awesome.min.css">
<link rel="stylesheet" href="https://cdn.jsdelivr.net/npm/leaflet.locatecontrol@0.68.0/dist/L.Control.Locate.min.css" />
<script src="https://cdn.jsdelivr.net/npm/leaflet.locatecontrol@0.68.0/src/L.Control.Locate.min.js" charset="utf-8"></script>
Now that the files are enqueued, we will add the plugin to every instance of our maps, only after they are initialized. For that, add this javascript code into your theme script.js or in a <script> tag just before the end of your html </body> tag (generally in your footer.php file):
<script>
// Listen for the event.
document.addEventListener('cttm_map_loaded', function (e) {
  // cttm_map is an array of all the maps included in the page, so we loop through each.
  for (let i = 0; i < cttm_map.length; i++) {
    //We add a locate control (button) on each of our maps in the page.
    L.control.locate({keepCurrentZoomLevel:true}).addTo(cttm_map[i]);
  }
}, false);
</script>
Interact with the markers objects (2.1.0)
As of version 2.1.0, the global array « cttm_markers » was added and contains all the Leaflet markers objects added on your maps, you can now interact with them.
It was made to work with multiple maps, so it is a multidimensional array. You should access a marker like this : cttm_markers[map_index][marker_index].
If you want to access the 5th marker added to the 2nd map on the page, you would need to write « cttm_markers[1][4] ».
Additional information added to the leaflet marker object
Inside the marker object was added an object named additionalData. With this object, you can access additional information such as :
- postid (int) : linked post ID
- title (string) : the title inside this markers popover (not necessarily the real post title if a custom popover title was set
- multipleMarkersIndex (int) : 0 means it’s the main marker. If higher, this number represents the additional marker index.
Example: Open a marker popover on a button click
Let’s say you have a list of posts on your page, and a map with markers of those same posts on it. You want to add a button « Locate on the map » on each post in the list. Let’s say you have this HTML :
<ul>
    <li>
        <h2>Cool first post</h2>
        <p>Description</p>
        <button type="button" class="locate-marker-button" data-postid="248">Locate "Cool first post" on the map</button>
    </li>
    <li>
        <h2>Second post</h2>
        <p>Description</p>
        <button type="button" class="locate-marker-button" data-postid="252">Locate "Second post" on the map</button>
    </li>
</ul>
Okay, what’s important here is « data-postid » on our button, on click, we want to find the marker associated with this post ID. The code below is explained line by line with comments:
<script>
// Listen for the event triggered when Travelers' Map is loaded
document.addEventListener('cttm_map_loaded', function (e) {
    //Find all the buttons and add a click event on each
    document.querySelectorAll('.locate-marker-button').forEach((button) => {
      //Get the post id "data-" attribute on the button
      const postID = button.dataset.postid;
      button.addEventListener('click', function (event) {
        findAndOpenMarker(postID);
      });

      function findAndOpenMarker(postID) {
        // We only have one map, so we will use cttm_markers[0]. If you want to work with multiple maps, you will have to add a second loop.
        for (let i = 0; i < cttm_markers[0].length; i++) {
          // If the marker post ID is the same as the button we clicked AND if it's the main marker.
          if (
            cttm_markers[0][i].additionalData.postid == postID &&
            cttm_markers[0][i].additionalData.multipleMarkersIndex == 0
          ) {

            // If the icon is not on the map, it means it's inside a cluster,
            // so you have to use .spiderfy() on the parent cluster to open the popup.
            // This will save you a lot of time understanding why it's not working ^^'
            if (!cttm_markers[0][i]._icon) {
              cttm_markers[0][i].__parent.spiderfy();
            }
            // Open the marker popup
            cttm_markers[0][i].openPopup();
            // Add a nice transition
            cttm_map[0].panTo(cttm_markers[0][i].getLatLng(), {
               animate: true,
               duration: 1,
            });
          }
        }
      }
    });
  }, false);
</script>
And voilà, when you click on a button, the marker’s popover will open and the map will center on it with a nice transition.
Use filters to modify popovers (2.2.0)
Two new filters were added : cttm_add_customfields and cttm_postdata_filter.
Add a custom field to popovers
// This functions add a custom field in HTML to you popovers.
// $cttm_customfields is an object composed of two properties :
// $cttm_customfields->postID is the post ID you can use to find custom fields
// $cttm_customfields->fields is an array of HTML strings you can add to the popover
function cttm_add_custom_field( $cttm_customfields ) {
	// This is an example with ACF to get a custom field
	$buttonlink = get_field('buttonlink', $cttm_customfields->postID);
	// If the custom field exists
	if ($buttonlink){
		$cttm_customfields->fields[] = "<a class='btn' href='".$buttonlink."'>Custom link text</a>";
	}
    return $cttm_customfields;
}
add_filter( 'cttm_add_customfields', 'cttm_add_custom_field');
Modify the popovers data
// $cttm_postdatas contains all the data sent to the popover, you can intercept it and do what you want with.
function cttm_add_custom_popover( $cttm_postdatas ) {
	// Do as you like
    return $cttm_postdatas;
}
add_filter( 'cttm_postdata_filter', 'cttm_add_custom_popover');